
Navigation 3 / Campaign Diary: Archipelago Adventures - Pt. 22
Today, we are going to travel to another island and start talking about the important things in life. And that means we need our map!
Traveling and Navigating
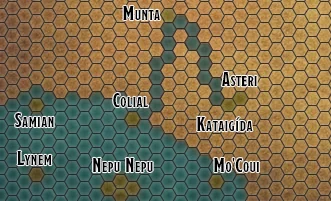
I went ahead and added the two new islands we discovered and it is time for our adventurers to roll their navigation check to determine where the next island is. I am assuming they are starting on the island with Fenja, though they may have decided to keep the meteor all for themselves!

Let’s go ahead and roll on our Navigation chart, and if you can remember back to Part 15, our Navigator has a +5 to their check. Here goes the roll…
Rolled a 12, so an adjusted 17 for our adventures! Very good, and things are looking good for us! Unfortunately we missed the best result by 2 for the 19+ column, but a 17 is a very respectable number! Now, we must roll our d100 and hope we roll low (so we get a closer island!)
32! That puts us at a North d7, East d7. As a reminder, we roll a d8, on an 8 we go 0 hexes in that direction for the island.
North - 4, East - 2

That gets us further out to sea, and gets us moving even deeper into this undiscovered terrain! Woo! I’ve gone ahead and figured out where our next island is.
But that isn’t the path we are going to take! We can go angles, and we should let our table decide which hexes they want to travel. Right now we have a few options:
We could backtrack up our Discovered Hexes in case we wanted a decrease chance of random encounters, but it would take us 8 days.
We could go straight towards the new island and get there in 5 days but all through Undiscovered Hexes in case we want more random encounters.
Or, we shoot past Asteri and then head north from there. It will still take us 5 days, but we get one day in a Discovered Hex and less chances of a random encounter.

We are going to head through Asteri, and then go North! Here is our selected path and we can finally start going! It will take 5 days, first day we will pass through Asteri and then 4 days of Undiscovered Hexes!
Journey On My Wayward Son

Day 1
Weather: Inclement Weather (9th of the Month)
# of Encounters: 5, 15, 8
Navigation DC: 10 (Leaving an Island) [Got a 21]

Day 2
Weather: Favorable Weather (10th of the Month)
# of Encounters: 9, 5, 13
Navigation DC: 15 [Got a 22]

Day 3
Weather: Favorable Weather (11th of the Month)
# of Encounters: 2, 7, 7
Navigation DC: 15 [Got a 14]
We are lost! But because we only failed by 1, that means we will roll a 1d3 and either go to the top left hex (1), on the hex marked 3 (top hex, 2), or to the top right hex (3).
Lost d3: rolled a 2
Now, we are still heading in the right direction, and even went on to the right hex (by accident) this means, we are still making good progress and well on our way to arriving to the island soon!

Day 4
Weather: Favorable Weather (12th of the Month)
# of Encounters: 19, 4, 7
(19) Encounter Time: (2) / 5am - 8am / Early Morning, sun begins to rise, Dim Light
Encounter: 71 on the Encounter Chart (TBD)
Navigation DC: 18 [Got a 23]

Day 5
Weather: Favorable Weather (13th of the Month)
# of Encounters: 3, 2, 11
Navigation DC: 15 [Got a 15]
Woo, just barely got that DC, and now we need to determine at what time does our party find this new island!
5 / 5pm - 8pm / Early Evening, sun begins to set, Dim Light
That’s not too bad of a time to find your island, gives you a decent amount of time to circle around it and learn a bit about your island until the morning when you decide to conquer… I mean land… on the island… heh. Just for fun, let’s go ahead and roll to determine what type of island is here:
13: Medium | Sparse | Tier 2 | Fertile
But Wait…
So, one thing we haven’t yet covered is… how big are these hexes and how fast is our ship moving? We have, for the sake of abstraction, assumed each Hex is a full day to travel through… but is it really? What if we sailed all night? What if we sailed really fast?
In the UA - Of Ships and the Sea, which is where we are going to be reliant for on our ship rules, though Ghosts of Saltmarsh may be used as well for this, the UA states that:
Travel Pace
Ships travel at a speed given their stat blocks. Unlike with land travel, players can’t choose to move at a faster pace, though they can choose to go slower.
If a ship’s mode of movement takes damage, it might be slowed. For every decrease of 10 feet in speed, reduce the ship’s pace by 1 mile per hour and 24 miles per day.3 miles/hour (72 miles/day): Keelboat
4 miles/hour (96 miles/day): Galley, Warship
5 miles/hour (120 miles/day): Longboat, Sailing ShipGalley
Travel Pace 4 miles per hour (96 miles per day)
Locomotion (water) sails
speed 35 ft.; 15 ft. while sailing into the wind; 50 ft. while sailing with the wind
Locomotion (water) oars
speed 30 ft.Sailing Ship
Travel Pace 5 miles per hour (120 miles per day)
Locomotion (water) sails
speed 45 ft.; 15 ft. while sailing into the wind; 60 ft. while sailing with the wind
I have grabbed two of the ships that are pretty much what you can expect from your ship and its speeds… Now how do we translate hard numbers into the abstract hex grid we got going? Well… I think the most logical conclusion is we don’t… not really. Instead let’s think to what type of ship are party is going to get.
They are tasked with getting back people taken by the hobgoblin fleet. This means we need a ship with room for passengers. That takes out Keelboats and Longboats. Now, that leaves us with only three options: Galley, Warship or a Sailing Ship.
I could see them getting a Warship… but they probably aren’t going to be leading an army against the hobgoblins… yet… Though, warships do allow them to carry a total of 40 crew and 60 passengers. Meanwhile, a Sailing Ship, the fastest of our three, allows them to only carry 30 crew and 20 passengers… not really going to be rescuing that many people, huh?
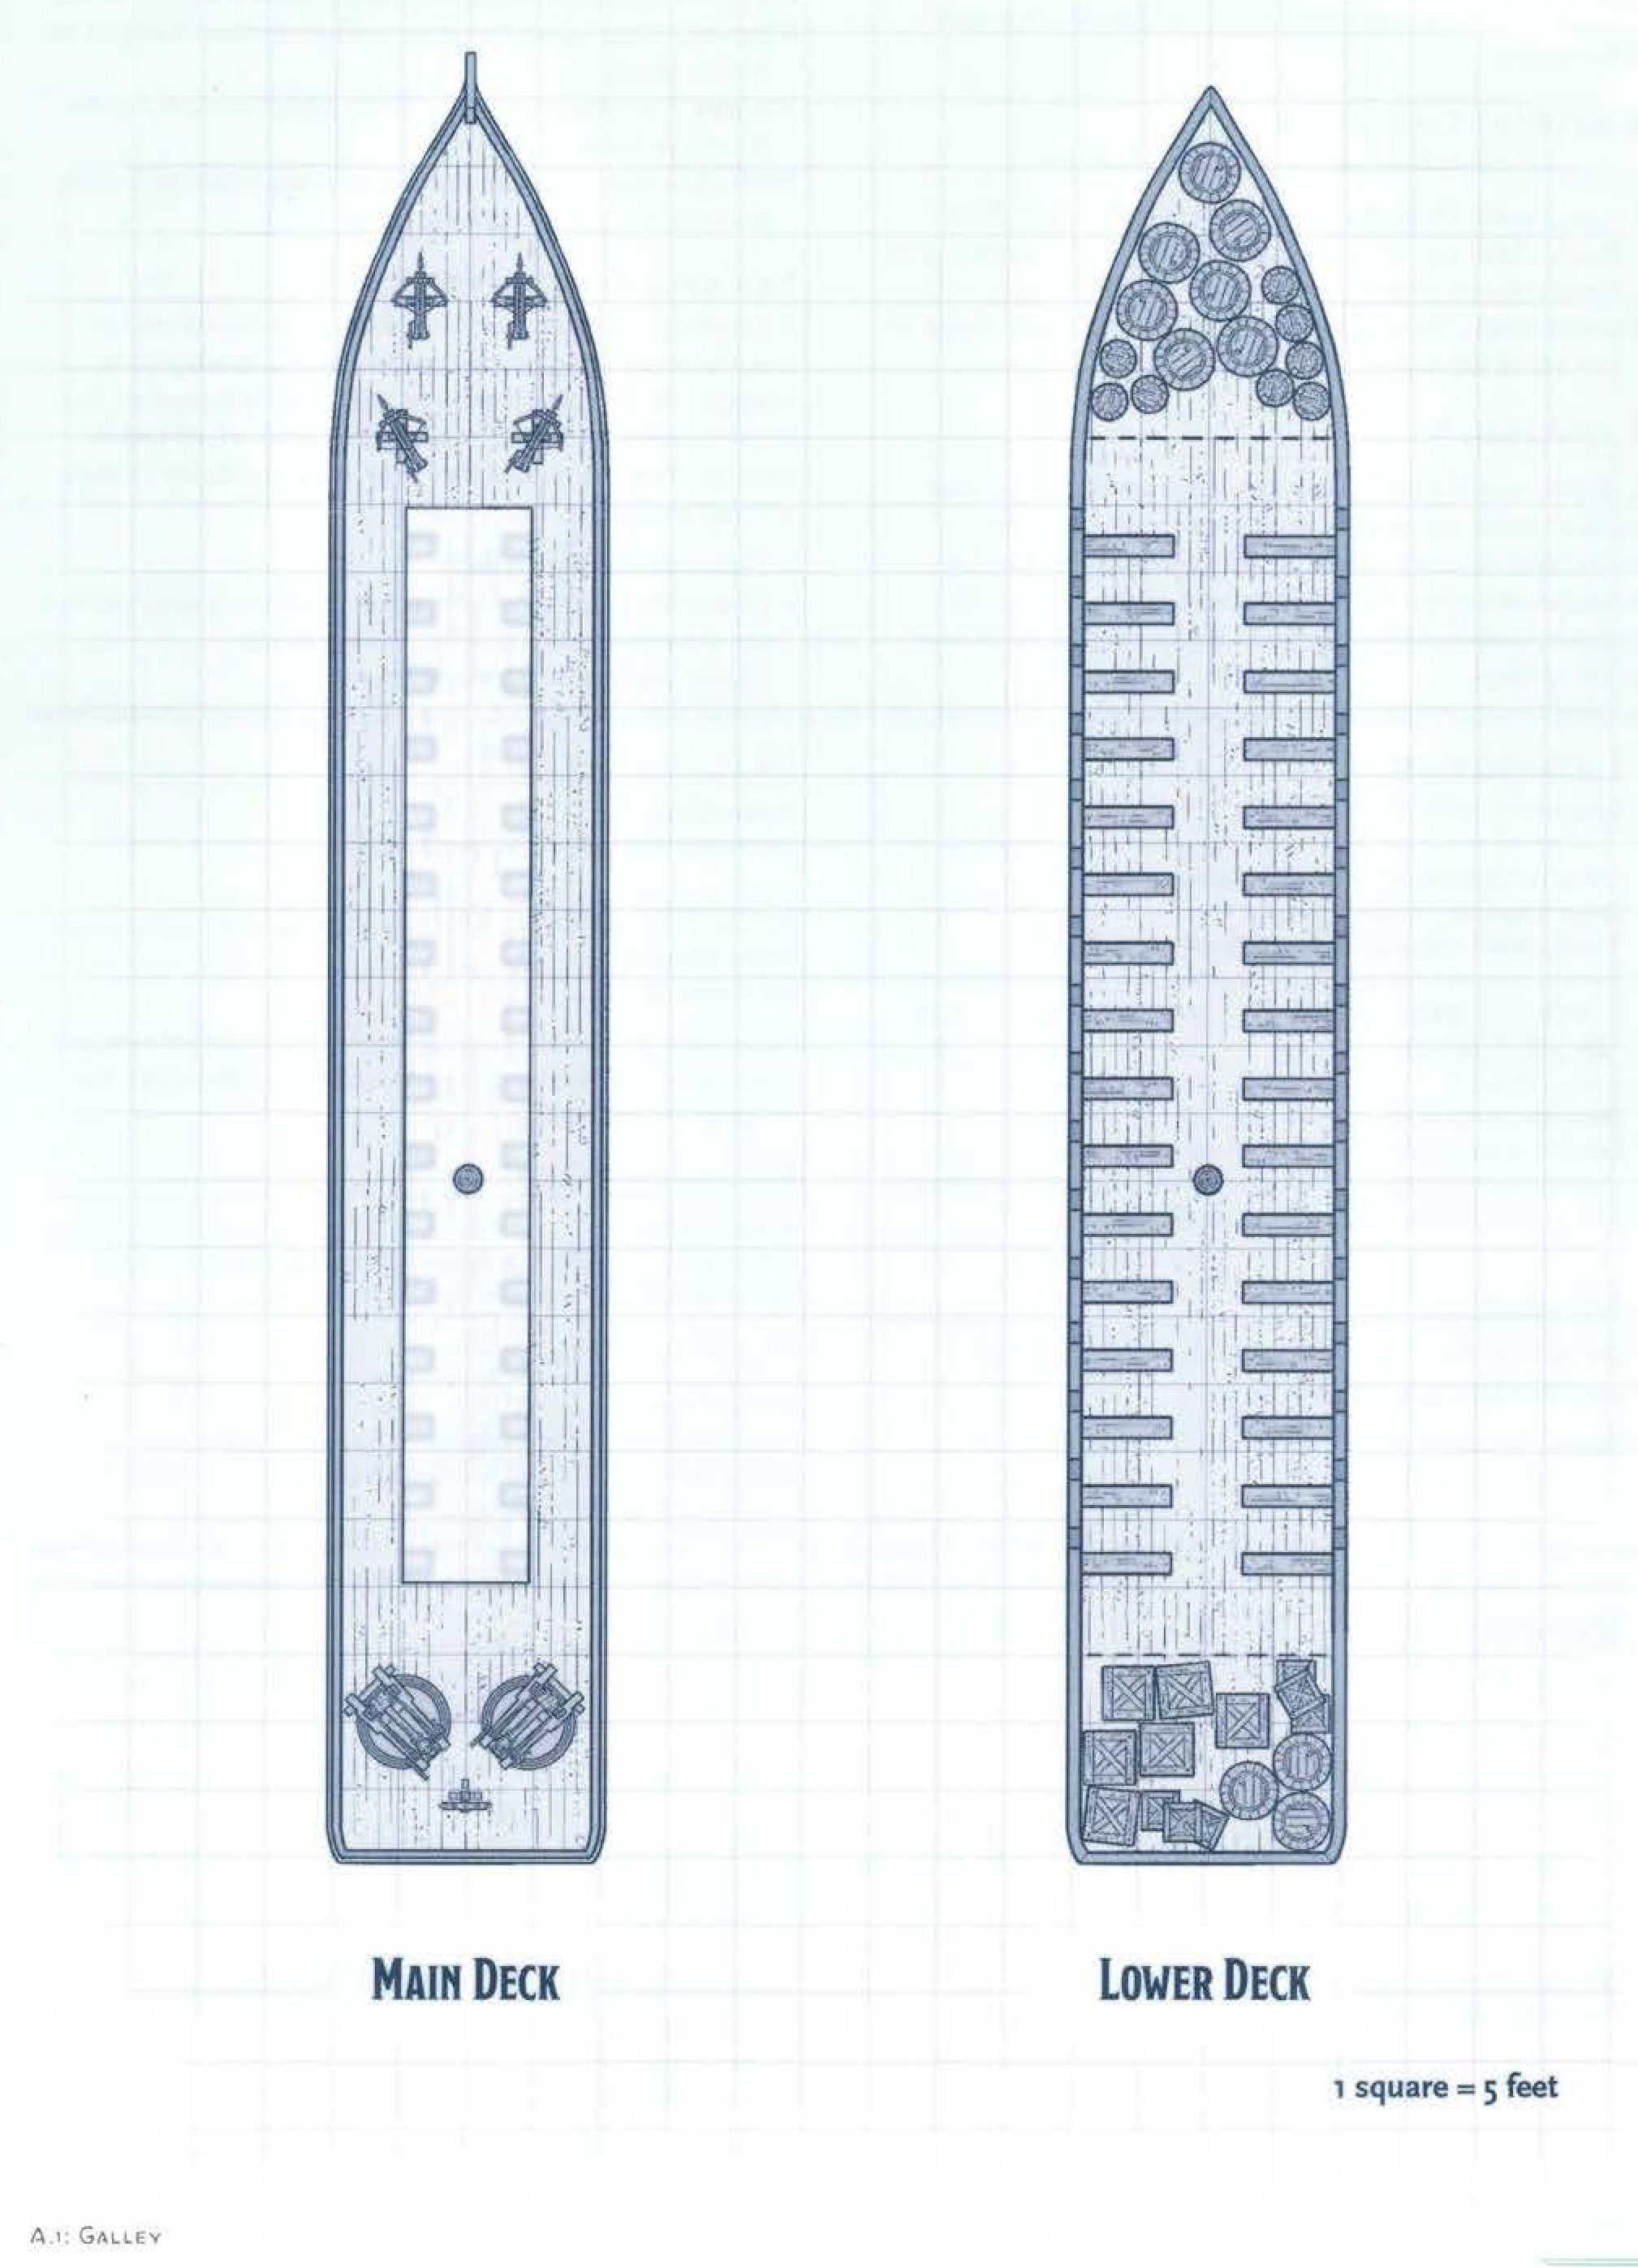
Galley - Ghosts of Saltmarsh
Surprisingly… I think our Galley is going to be the best option with room for 80 crew and 40 passengers, furthermore it can carry 150 tons of cargo. A Sailing Ship can only carry 100, whereas the Warship can carry 200 tons. Though one big problem comes up when you begin looking at the map of a Galley in Ghosts… there are no sleeping areas. They aren’t meant for long adventures on the ocean and I can’t imagine my table looking at their galley and deciding that they should spend months at sea on it.
So, that actually leave us with only two ships: Sailing Ships & Warships. I can see the ships going either way for the party, one focuses on speed and movement… the other focuses on being a tank and carrying more people. And… I think… we are going to give our players a…
Drumroll please…
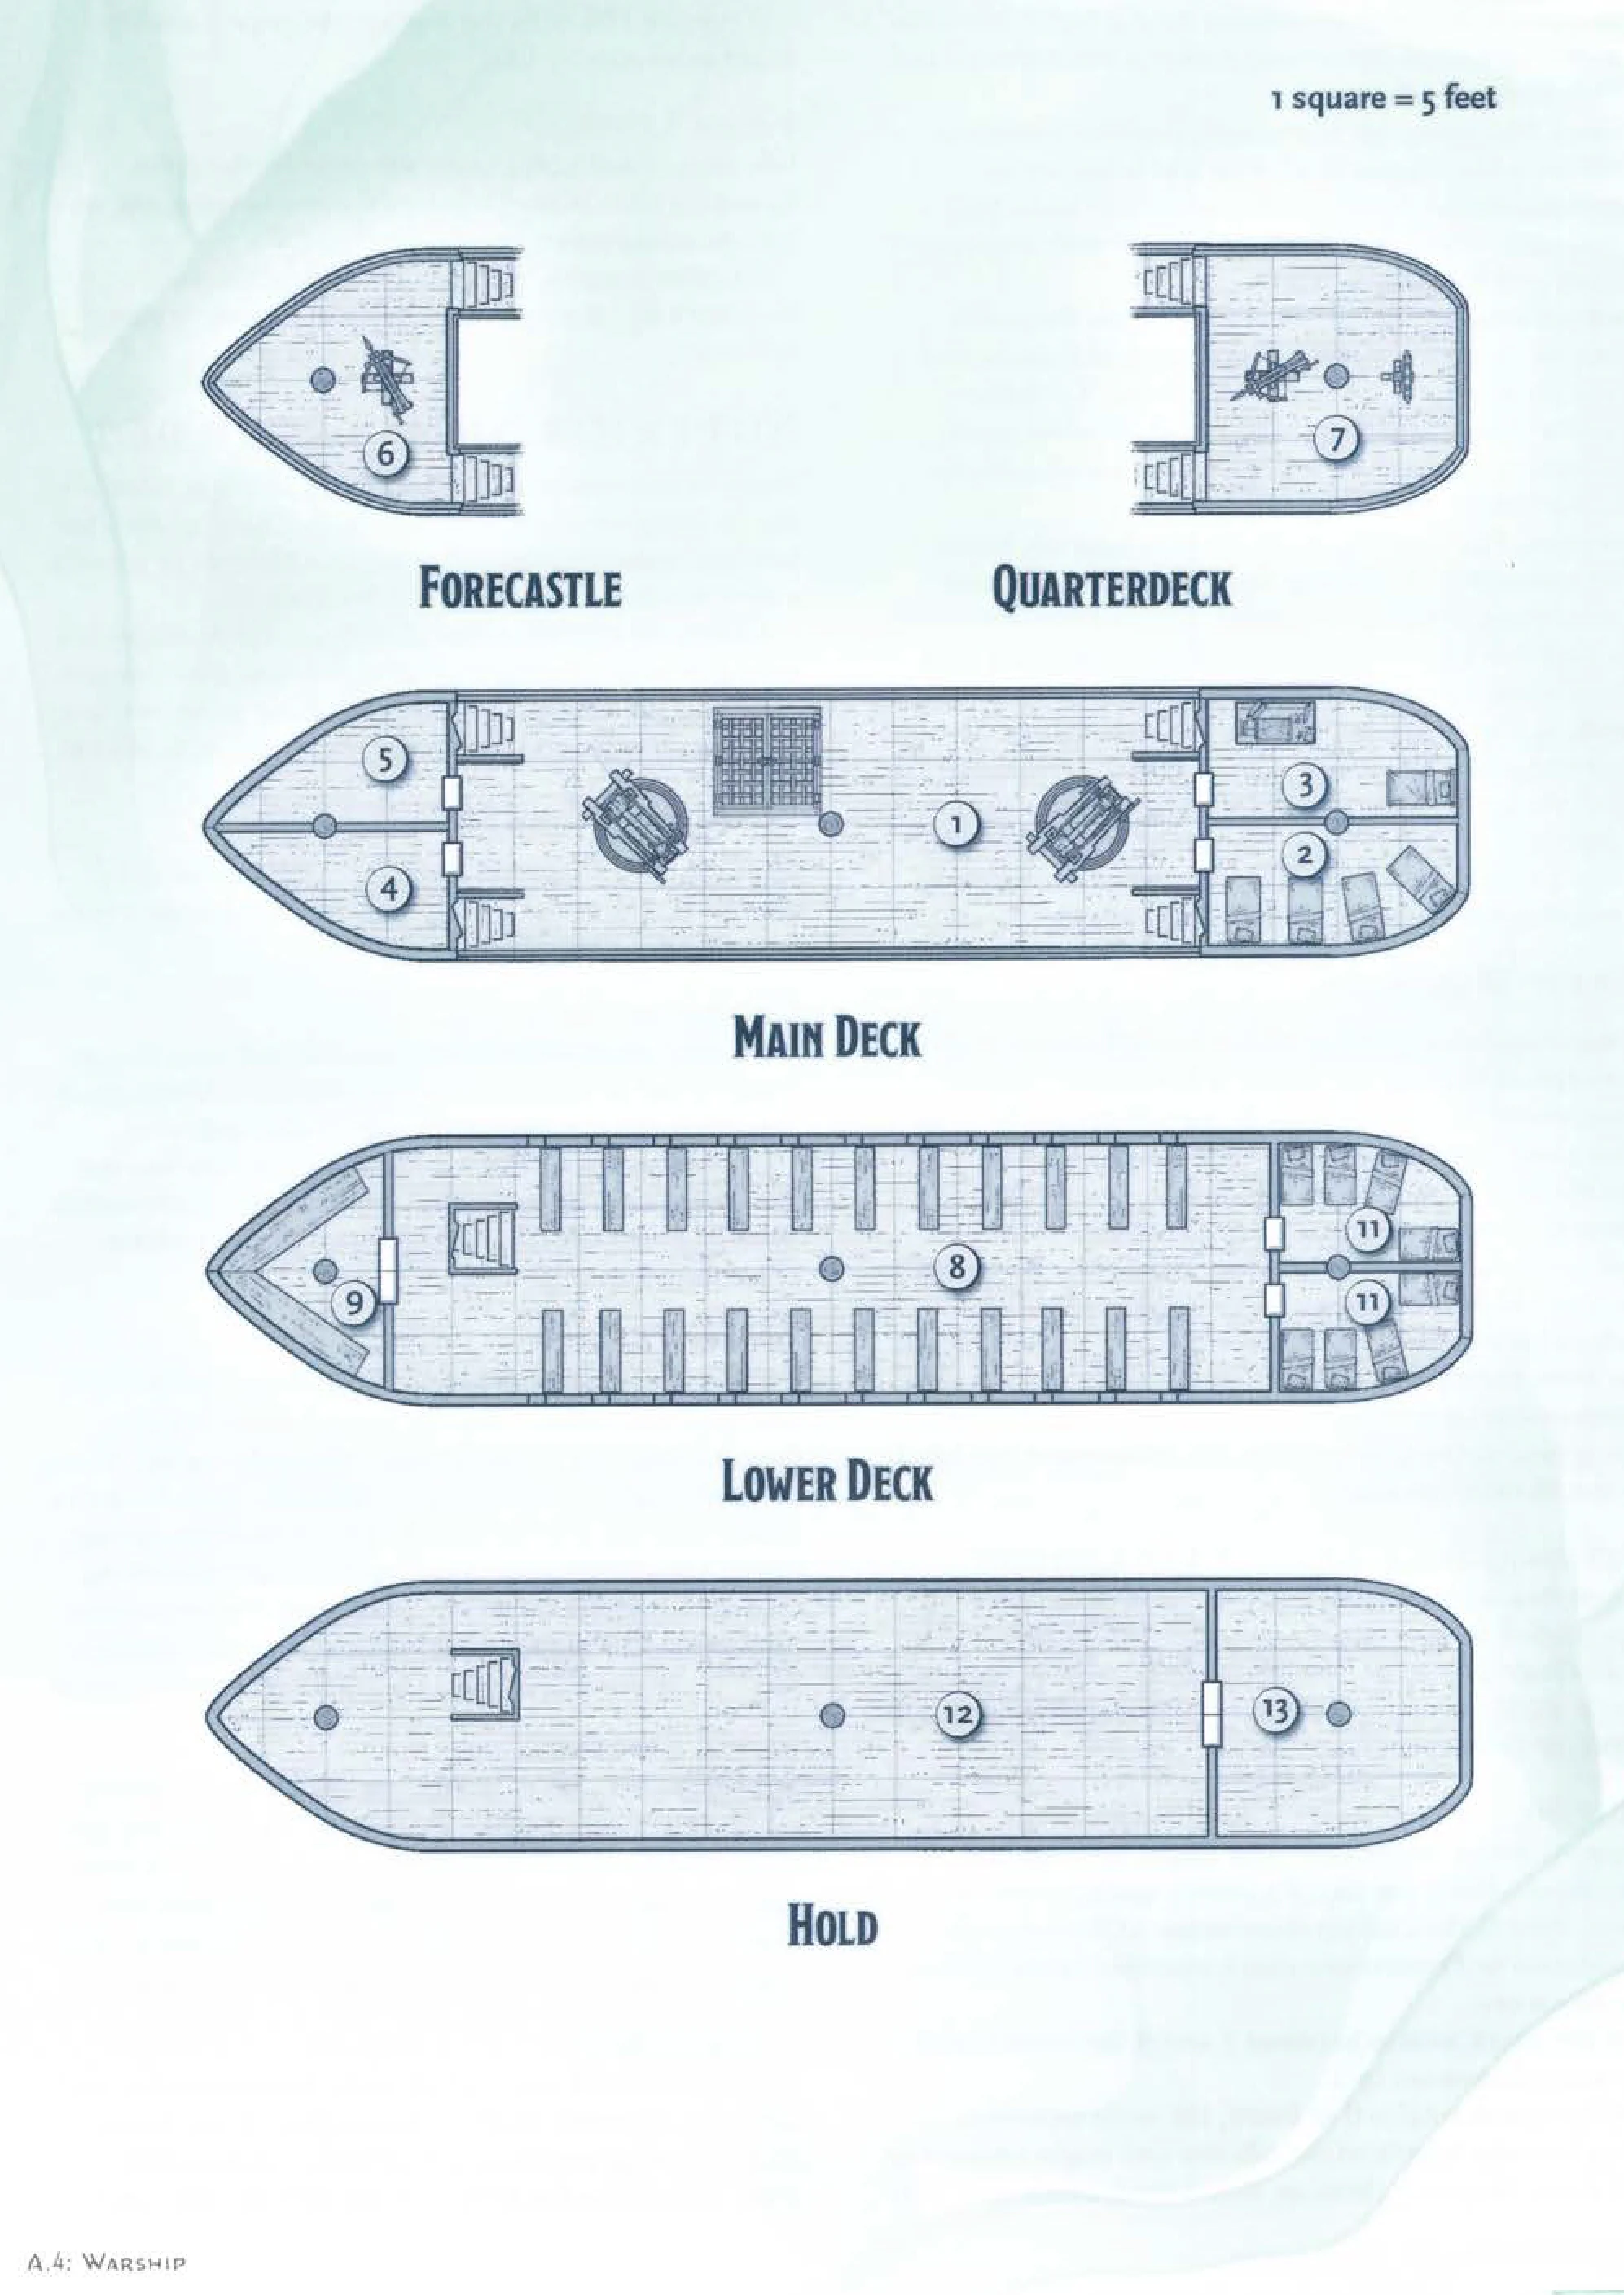
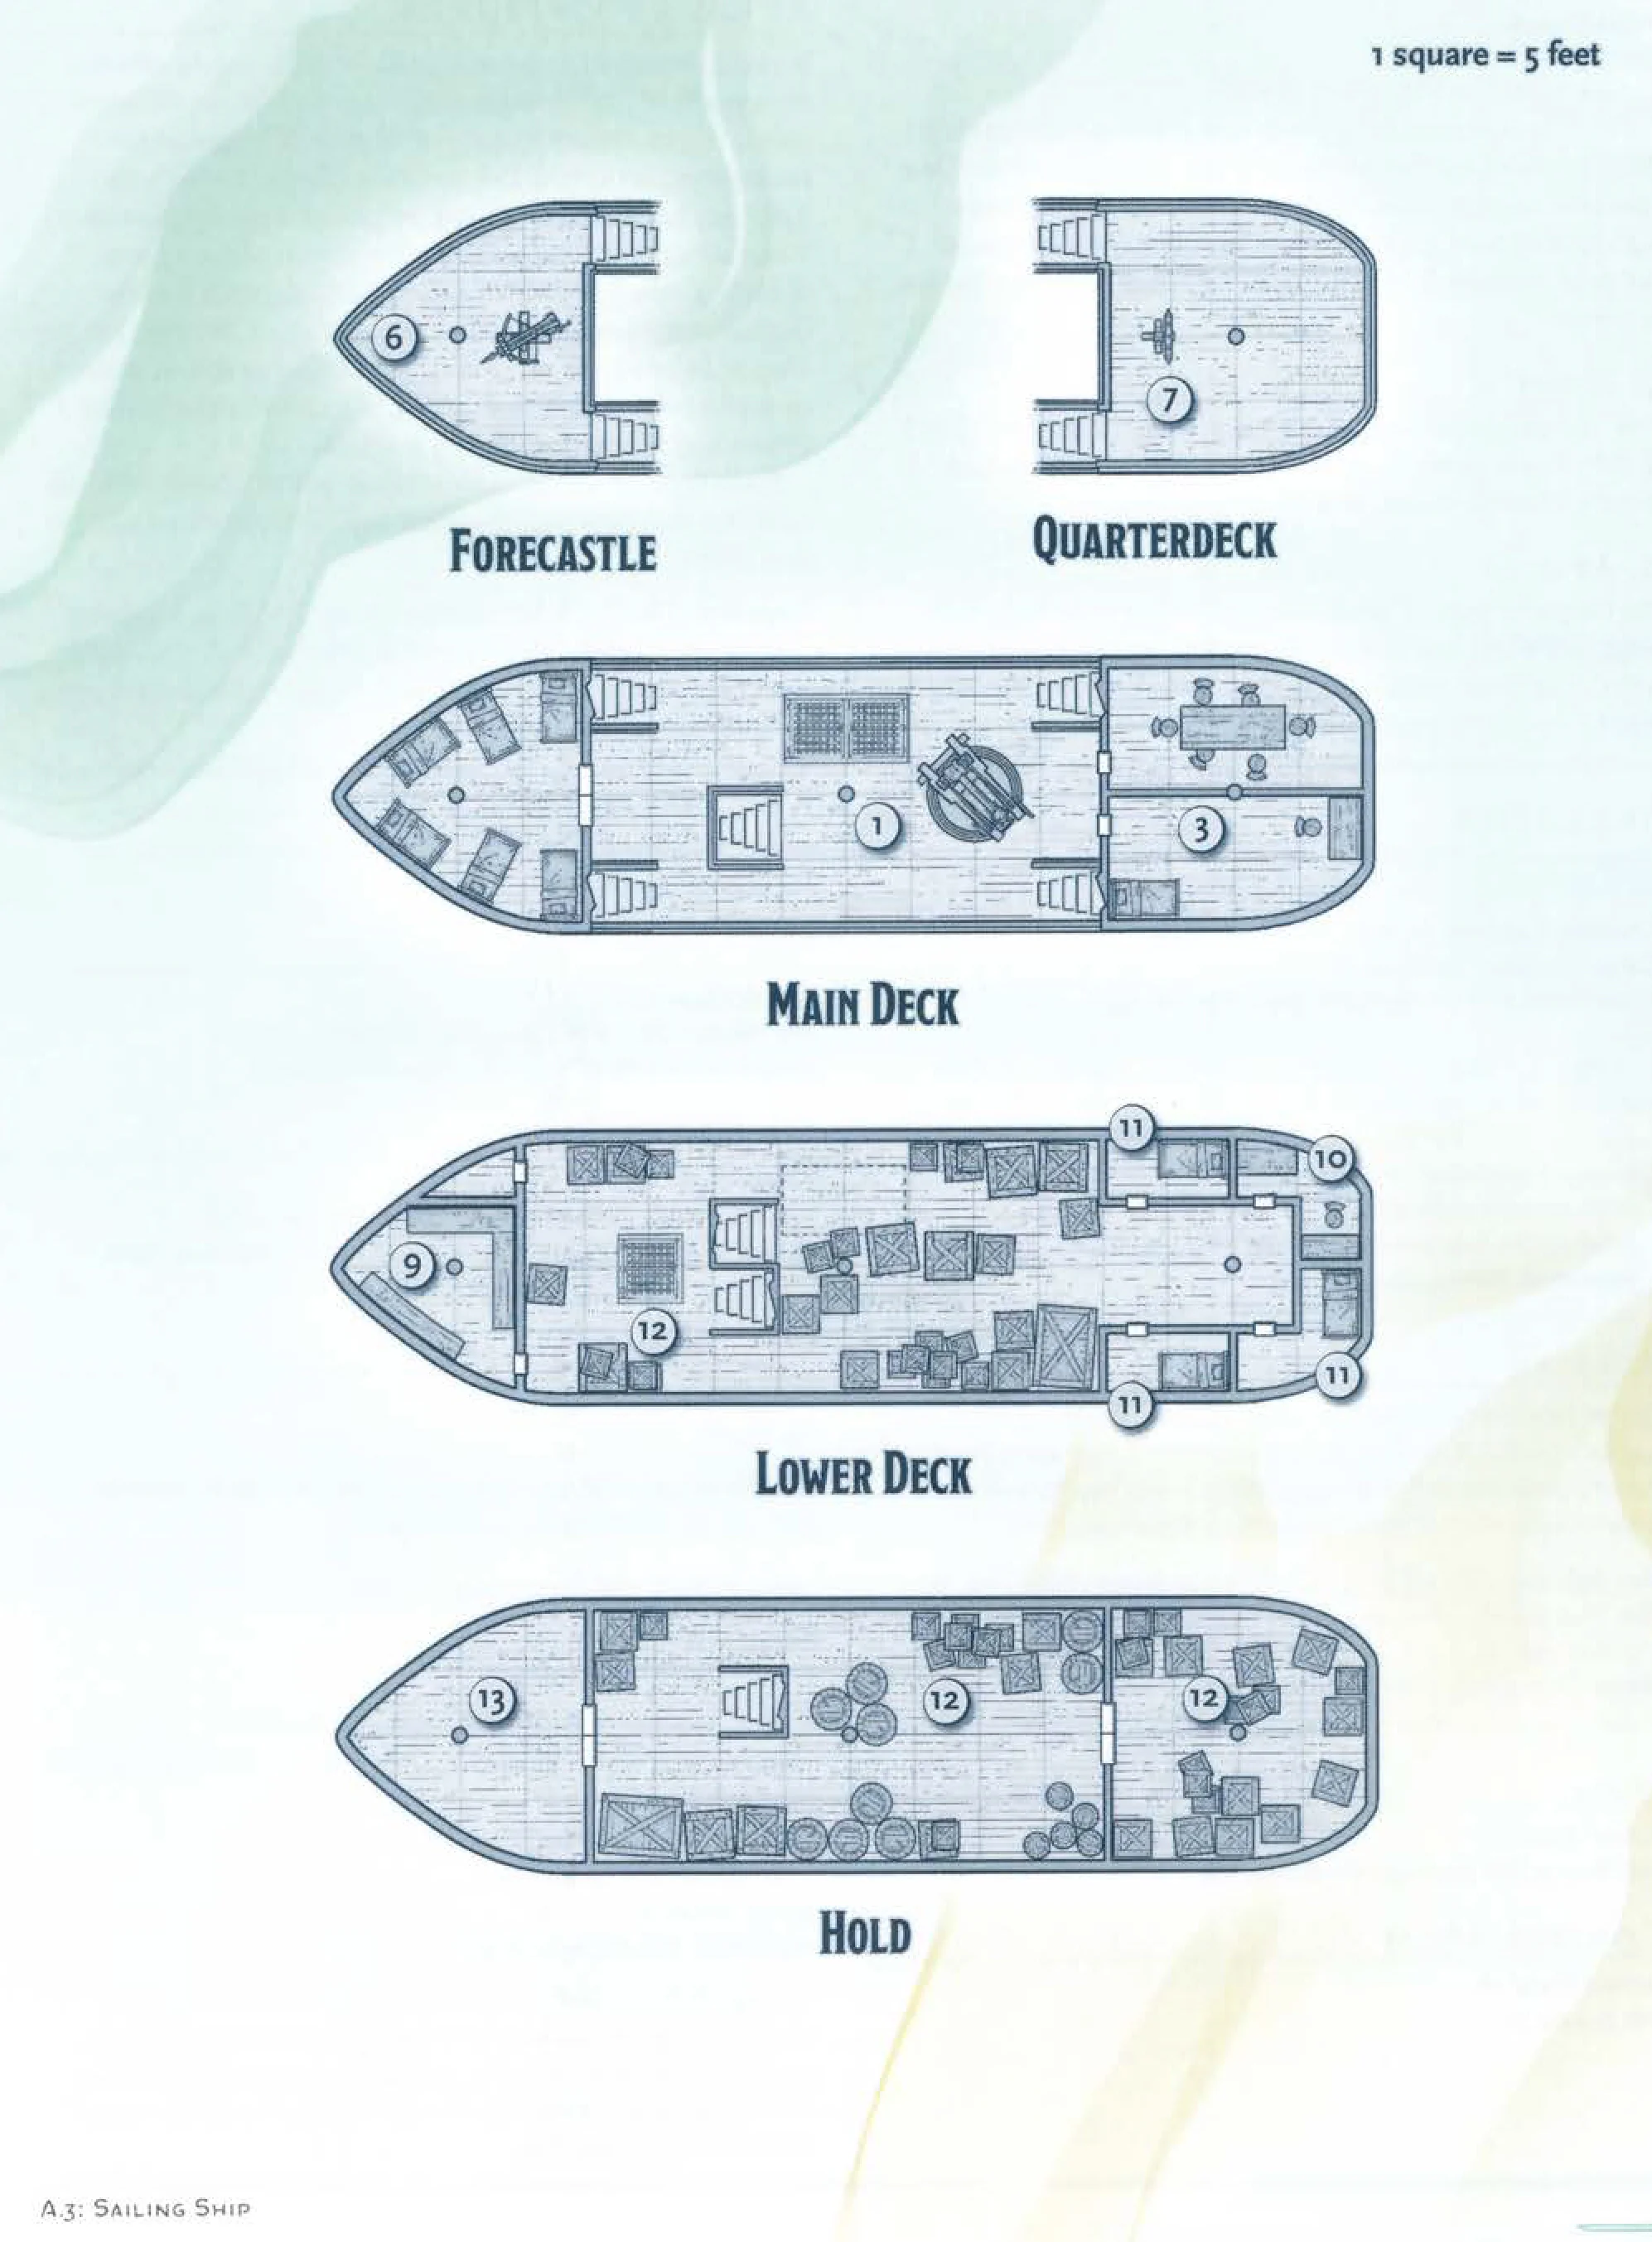
Warship - Ghosts of Saltmarsh
A warship. This is largely because looking at the maps of the ships in Ghosts of Saltmarsh, I see there being far less yelling at the table about who gets what room on the warship. Plus, they are on a rescue mission and will need the power behind them when they go to rescue people, as well as the increased space for all of them.
By going down this tangent of what ship the party is going to get, this helps us figure out our hexes. Plus, a Warship travels 1 mile slower than a Sailing Ship. If they decide to upgrade their ship to a faster one in the future, they will actually have a place they can increase it too, and they’ll be excited that they get through the hexes faster!
Sailing Ship - Ghosts of Saltmarsh
Futhermore, this means each hex going forward is 96 miles wide. For every additional mile an hour they get for 24 hours, they will move a hex and a quarter. For every loss of a mile an hour, they will travel one quarter less (until they just float there). This helps our poor and overburdened DMs focusing on easy to remember information. A quarter hex, a half hex, a three quarters hex and a full hex. Simple math made easy, and its all because I decided that I didn’t want to hear my party complain about which room is theirs on the boat… though I assume there will still be arguments about who is the captain!
Another fun thing about movement with Warships is that WotC very nicely adds in what their speed is with the wind and against the wind:
Locomotion (water) sails
speed 35 ft.; 15 ft. while sailing into the wind; 50 ft. while sailing with the wind
This means our ship will travel half a hex per day when sailing into the wind (2 miles per hour) or travel 1.25 hexes per day when sailing with the wind (5 miles per hour)! I mean, that isn’t exact as they technically travel 132 miles per day (5.5 miles per hour) when sailing with the wind, but that doesn’t break down into useful math for me, so we are just going to abstract it out… WotC had a chance to make things simple for us, but again… they never consult me on these things!
Come Sail Away
Now, we got our Warship figured out, and we know what ship our party is going to get once we get our adventure going! If they decide to upgrade to a Sailing Ship, this does mean they will travel 1.25 hexes per day just regular, and that’s cool! That gives them faster mobility across the map and will get them going… but not at first, first they must enjoy the ocean voyage. To make it easier for all to figure out how fast their ship goes per hex, here’s a small chart:
3 miles/hour (72 miles/day): Keelboat
.75 Hex/day; .25 Hex/day sailing into the wind; 1 Hex/day sailing with the wind4 miles/hour (96 miles/day): Galley, Warship
1 Hex/day; .5 Hex/day sailing into the wind; 1.25 Hex/day sailing with the wind5 miles/hour (120 miles/day): Longboat, Sailing Ship
1.25 Hex/day; .75 Hex/day sailing into the wind; 1.5 Hex/day sailing with the wind
That’s about as simple as we can get to what is assumed as 24/7 sailing on the high seas! And yes, we are going to assume these ships are traveling 24/7 just to make things easy, that is what WotC does, and if it is good enough for WotC, it’s good enough for me… well… sometimes it is good enough for me depending on what it is, and honestly, it rarely ever is good enough for me!
Next week… let’s tackle my moby dick and start working on resource management!
Sharks
What you first mistook for a pod of dolphins following you is actually a large group of sharks. The crew is quite superstitious and will inform the party that it is an ill omen to have ravenous sharks following you.
1. A frenzy of sharks are following you closely, scaring off any fish in the area and making it harder to fish. If the herd of sharks is not dealt with, than there will be no fresh meat tonight and the morale on the ship drops.
2. There is a single shark slowly tearing small chunks out of your hull. It appears to be quite focused on trying to sink you by itself. In the water is an extremely smart Giant Shark that has learned that prey is far easier to feed on when they don’t have a ship. Most hulls have a DR of 15 to 20, and the average damage of a Giant Shark is 22 points of slashing damage. While there isn’t an immediate danger to the ship, after only 10 minutes the Giant Shark will have dealt a large cumulative amount of damage and it is best to deal with the shark as soon as possible.
3. The party has found a vibrantly colored reef below them, and they can just make out the shape of what looks like a sunken keelboat resting in the reef. If the party goes to investigate the ship, there are 2d4 reef sharks who claim this ship as their territory and home. If the party is able to deal with the sharks, they can find a pair of footlockers in the Keelboat cabin that holds soggy clothes, a small pouch with 2d6 gold pieces and a journal so waterlogged that it is completely illegible.
4. A shiver of Hunter Sharks ridden by 2d6 Sahuagin and a Sahuagin Wave Shaper have snuck up on the boat. The plan is for the Sahuagin to start throwing the crew overboard and the sharks will kill anyone thrown overboard. If the Sahuagin Wave Shaper is killed, the rest of the Sahuagin will flee on any surviving sharks, they are hoping to take the ship over, sink it and raid it of all its valuables, and potentially take a few of the crew as slaves.